A Short video of a Bachmann Sound-Value CNR RS3 switching on my little layout.
Sunday, September 13, 2015


Monday, October 6, 2014
Freight for the 66

They also hauled departmental works trains/wagons of rails,ballast, wheels and the like.
So the other day I took delivery of 3 types of modern fright wagons to form various trains. I'll now start weathering them and making/adding various loads for them.
So I got 4 each of these 2 types of modern open-wagons.


Thursday, October 2, 2014
Class 66 Loco Modern Image Locomotive

However one exception to that was the Class 66 diesel locomotive. They are a freight locomotive, operated by various companies both on the European continent and in the UK. and are manufactured in London,Ontario Canada by the Electro Motive Division (EMD).
There was just something about the actual lines of the body that appealed to my eye and the EWS livery is to my mind very handsome .
Unfortunately the models on the market back then were not very good in my opinion but in recent years that has changed. When I saw that Bachmann was offering them in the EWS livery with sound I just had to get one.
It arrived last week and a lovely model it is, ran beautifully right out of the box and the sound was very impressive.
I'm no expert on these locos and have never seen or heard one in real life so cannot comment on the accuracy of the model itself or the sound files, but it looks right to me and the sound works to my ear.
So I checked photos of the real thing on the web and used them to guide my weathering job on this loco. I just wish my photography was better….


Tuesday, September 30, 2014
Athearn 40' Box Car with Youngstown Door
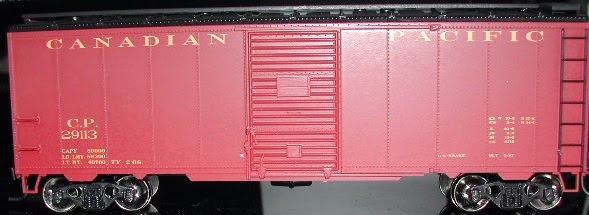
I believe roof walks were phased out of service by the late 70's. This particular car is showing a July 1937 build date. It already has had a spray of dullcote applied to it. So my next job is to remove and discard the plastic Accumate couplers and remove the wheels and trucks for painting.
I've found only one pic on the web of this type of boxcar in this particular Canadian Pacific livery, and its colour is extremely close to that of the model. So this will be my weathering "template" if you will.

Water-Colour Pencils
I ran across an article that intrigued me last summer, about weathering with watercolour pencils. Embedded in the article was a short video clip wherein the technique is demonstrated.
https://www.youtube.com/watch?v=vjWckomnpqE
I really liked the simplicity and effect of this way of doing some subtle shading and weathering so of course off I went to the local art--supply shop and bought a pack of water-colour pencils.
Essentially what you do is dip the pencil in Windex(see post of last Friday, the 26th of Sept.) or water and apply the mark,colour where and how you want…then using a soft damp brush you feather and adjust the colour to the way you want it. There is a bit of a learning curve…but the beauty of the technique is you cannot ruin a model….its water-colour after all….a damp cloth and it's washed off the model….at least until you seal it.
A few months ago I ran across this discussion about water-colour pencils on the Protomodeler website, http://www.protomodeler.com/index.php?/topic/2138-weathering-with-water-soluble-watercolor-pencils/?hl=fading
These guys do some amazing work and it is worth checking out not only the discussion about the water-colours but the whole site. Anyway, the other option discussed was to use the pencils dry, not wetting them before applying the colour. I've tried both methods and for me the dry pencil works better, I seem to have more control of the colour. The important thing is to just give the idea a try…nothing ventured nothing gained!
https://www.youtube.com/watch?v=vjWckomnpqE
I really liked the simplicity and effect of this way of doing some subtle shading and weathering so of course off I went to the local art--supply shop and bought a pack of water-colour pencils.
Essentially what you do is dip the pencil in Windex(see post of last Friday, the 26th of Sept.) or water and apply the mark,colour where and how you want…then using a soft damp brush you feather and adjust the colour to the way you want it. There is a bit of a learning curve…but the beauty of the technique is you cannot ruin a model….its water-colour after all….a damp cloth and it's washed off the model….at least until you seal it.
A few months ago I ran across this discussion about water-colour pencils on the Protomodeler website, http://www.protomodeler.com/index.php?/topic/2138-weathering-with-water-soluble-watercolor-pencils/?hl=fading
These guys do some amazing work and it is worth checking out not only the discussion about the water-colours but the whole site. Anyway, the other option discussed was to use the pencils dry, not wetting them before applying the colour. I've tried both methods and for me the dry pencil works better, I seem to have more control of the colour. The important thing is to just give the idea a try…nothing ventured nothing gained!
Monday, September 29, 2014
New IWATA HP-SB Plus Airbrush

I've always used Badger Airbrushes and am especially happy with my Badger 105 Patriot. However I've heard really good things about these Iwata brushes…..and after a first quick test….I'm really liking this one. It sprays a really fine pattern and very, very thin lines. It also has a very user-friendly and simple adjustment knob for adjusting the thickness of the paint flow. The other cool thing is that I can mount the paint cup on either the left or right side of the brush body within a couple of seconds without using any tools. That could come in very handy under certain circumstances. The trigger pull is a bit stiffer than I'm used to but I'm sure I can get used to it. Here is a link to the brush specs….
http://www.iwata-medea.com/products/iwata-airbrushes/high-performance-plus/hp-sb-plus/hp-sb-plus-specifications/
Friday, September 26, 2014
Weathering a White Billboard Reefer
Just a quickie…my next weathering project….a Roundhouse HO white wooden billboard-reefer. I think I'll keep it to a light fade and light dust on the running-gear and sills….but maybe not :o))

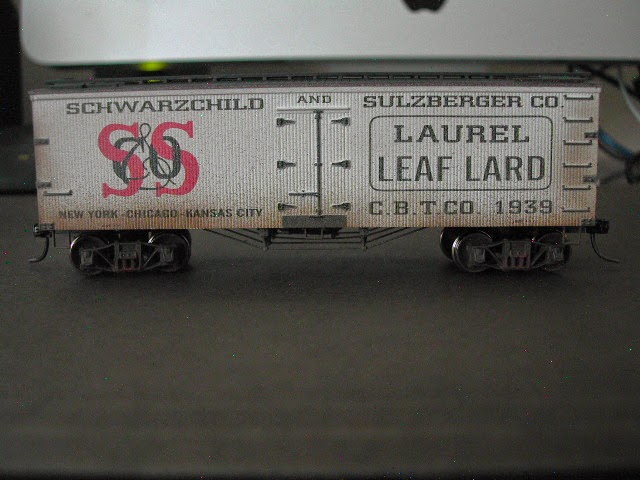
So I finished this weathering project today. I learned that white-boxcars are, in my opinion, harder to do a credible weathering job on than red,brown,oxide or black cars.
As always my first step was to spray the car down with some Testors Dullcote out of a rattle-can.
I always do this for 3 reasons, #1) it tones down and dulls the shiny plastic look of the model,
#2) it gives the model some tooth to allow weathering powders and/or paint to better adhere to the model.
#3) it seems to help disappear accidental fingerprints, from this point on through the rest of the weathering process I only handle the model while wearing gloves, until finished.
I next removed the trucks , wheels and couplers, and mixed up a small amount of white paint with some tan and light grey paints and proceeded to fade the sides of the car…this dulls down the white body colour of the car and slightly bleaches out the black and red lettering, giving the car a bit of a sun-worn appearance.
Next I ran the black and red of the letters using water-colour pencils….unfortunately the effect, being quite subtle, did not show up on the pics…my camera skills are sadly lacking…. :0(
I followed that with a coat of black to the roof and the ends of the car and then a dusting of road grime to the lower edges and corners of the car.
The trucks were scuffed-up with a fibre-pen and given a coat of dirt, with a bit of rust applied to the springs…the wheel faces were rusted and dirtied up in a similar fashion.
Job done.
Subscribe to:
Posts (Atom)